Soil Blocking FAQ: A Beginner’s Guide to Growing Without Plastic
- Feb 28, 2025
- 12 min read
Updated: Mar 28, 2025
I started using soil blocks back in 2014. At that time, I was sick of sorting through the large pile of different sized plastic trays that I had accumulated and longed for a seed starting system that didn't encourage the flow of more plastic garbage in our economy.
In theory, the soil blocks seemed like a good idea. With just one block press, I could make an unlimited number of blocks that would hold their shape without plastic containers and the air pruning effect of the blocks would result in more stress free transplanting experience for my seedlings. The benefits all sounded good, but would they turn out to be true?
Today, I'm going to reflect back on the soil block questions I had when I was getting started and fill in the answers I've gathered over time after starting thousands of seedlings with this method. This post is organized according to the most frequently asked questions I tend to get on the subject of soil blocks. If you like, you can click the question you have in mind to skip down to the answer.
How do soil blockers work?
Strong metal soil block presses are used to make soil blocks. First, the soil blocker is pushed down into a pile of potting mix to fill the block cavities with potting mix. Then the soil blocks are pressed onto an empty tray by pushing down on the ejector handle of the soil blocker while slowly lifting up the main handle. A video demonstration will probably help you understand this better than words, so here's a look at the process.
What ingredients are in the soil block mix?
The most common recipe we use for medium sized blocks is as follows:
30 cups peat moss for moisture holding capacity and block stability
25 parts compost for micronutrients, stickiness, and moisture holding capacity
20 parts perlite to help maintain pore space and drainage ability
3/4 cup organic fertilizer blend to ensure an amply supply of macronutrients
2 Tbsp lime to balance the acidity of the peat moss
If you're concerned about the sustainability of peat moss, read this post.
The video below walks you through the purpose of each ingredient, shows how I make our mix, and demonstrates the pressing of a few different sized blocks.
Do the blocks stick together?
Yes. I can pick them up with my fingers immediately after pressing, although they are best handled with a bottom trowel or tongs if you need to move them around right away. Over time, the blocks become even more unified as roots grow throughout the core and the block materials bond together more thoroughly after several watering and drying cycles. As long as you don't water them with your pressure washer, you'll be fine.

Don't I still need trays to hold the blocks?
Yes. You still need a strong surface to hold your blocks once they are made, but since the soil blocks hold themselves together and their block size is not dependent on the try, you've got a lot of options. There are wood, metal, and stronger plastic trays that all could work well with soil blocks.
I was keen to stop using plastic trays so I built a bunch of wooden trays following the dimensions that Eliot Coleman recommends in his book The New Organic Grower. These dimensions make a lot of sense for the smallest soil blockers that most home growers will use.

If you'd rather buy your trays off the shelf somewhere, you've still got options. I just suggest avoiding the cheap lightweight plastic trays found in moist garden centres. The corrugated bottoms aren't great for smaller soil blocks and the trays are far too weak to support the mass of the larger blocks.
What you do want are stiff trays with low sidewalls that allow you to slide out the blocks easily. Fast food trays come in a range of sizes. Aluminum baking pans have ridges to contain water but they won't rust. These are two good options if you can find sizes that match the dimensions of your soil blockers and seed starting shelves.


I would avoid buying strong high-walled plastic trays even if they are marketed for soil blocking purposes. This sturdy tray shown below is marketed by Bootstrap Farmer as one suitable for soil blocks, and while it does have holes in the bottom to encourage air pruning in the soil blocks, the 2.5 inch high sidewalls make it harder to get at the blocks once you're in the field. Soil blocks are really easiest to handle when you can slip a trowel in between and under them and any high walls on a tray make this much more difficult.

Won't the roots from one block start to grow into neighbouring blocks?
Ideally, there will be a small air gap between each of your blocks. Since roots don't like to be exposed to the air, this gap helps prevent them from leaping across to neighbouring blocks. The roots also won't wind themselves around the outside of your plugs. Instead, they will concentrate their growth in the core of the block. If you've ever purchased seedlings in plastic cell trays, you've seen the opposite scenario when roots have wound circles around the outside of the plug. These exposed roots experience maximum shock during the transplanting experience because they are out in the open. With soil blocks though, the air pruning of the roots focusses their growth primarily in the core of the block, and here they will experience much less transplant shock when they are transplanted into the garden.


While the thin air space between blocks will serve its purpose for a short time, it can't hold the roots back forever. If you leave your plants in small blocks for too long, the roots may start to find their way into other blocks. Over time debris can wash into some of the air spaces and bridge the gap between two blocks and if plants become oversized for their blocks, their roots will desperately search for more space, usually crawling along the bottom of the tray and up into neighbouring blocks.
How do I pot up my plants with soil blocks?
Potting up is the process of increasing the size of a seedlings growing container before it runs out of space. It doesn't seem like you would be able to increase the size of a soil block because they don't even have a container, but thankfully, soil block creators thought of this too. Today, some soil blockers come with larger cube-shaped dibblers to make the process of potting up really slick. The 2 inch blocker can be fitted with 3/4 inch dibblers to make holes perfect for the 3/4 inch blocks, and the 4 inch blocker is built with a permanent 2 inch wide dibbler assuming that all seedlings planted in a 4 inch block will start in a 2 inch block. You can see the difference between the dibblers of the smaller blocks in the video clip below.

Many of our seedlings will start in 3/4 inch blocks and then be potted up into 2 inch blocks, and I can do this just by picking up a 3/4 inch block and sliding it into the perfectly sized 3/4 inch cavity that has been dibbled in my 2 inch block. The 2 inch blocks can also be potted up easily into the 4 inch blocks.
The perfectly matched size of these dibbled holes does have one limit. You can't plant the seedling deeper in the new block when you pot it up. Sometimes growers wish to do this if their tomatoes are a bit too lanky and they want to help prevent the plants from falling over. The problem of lankiness is related to lighting though, so planting a seedling deeper is only going to make you feel like you solved the problem for a few days. The plant will continue to grow tall and weak unless the lighting problem is addressed.

Which sizes of soil blockers do I need?
Each crop we grow has an ideal sized soil block (or combination of soil blocks if potting up is involved) but often there are secondary block sizes that will still get the job done. Therefore, it's possible to get started with just a 3/4 inch and 2 inch soil blocker and meet most of your needs. Eventually though, you'll realize that the 2 inch blocks are quite excessive for a lot of plants and that they are taking up too much precious space under your grow lights and using up too much soil mix unnecessarily. Also, if you're without the largest blocker and you're never potting up any plants to the 4 inch block size, you'll be limiting some of your warm season crops to much slower starts in the spring. Therefore, I think the best complete set for the serious home grower would include a 3/4", 1.5", 2", and 4" blocker. I also have a 1 inch stand up blocker that helps me work a bit faster for large plantings of crops like lettuce, onions, and beets, but I think this is overkill for the home grower. The basic set of 4 smaller blockers should be all you need, and the Seed to Table course will tell you the ideal block size for each crop, which ones we pot up along the way, and the amount of time each crop should grow in its soil block before transplanting.


What's the best way to water soil blocks?
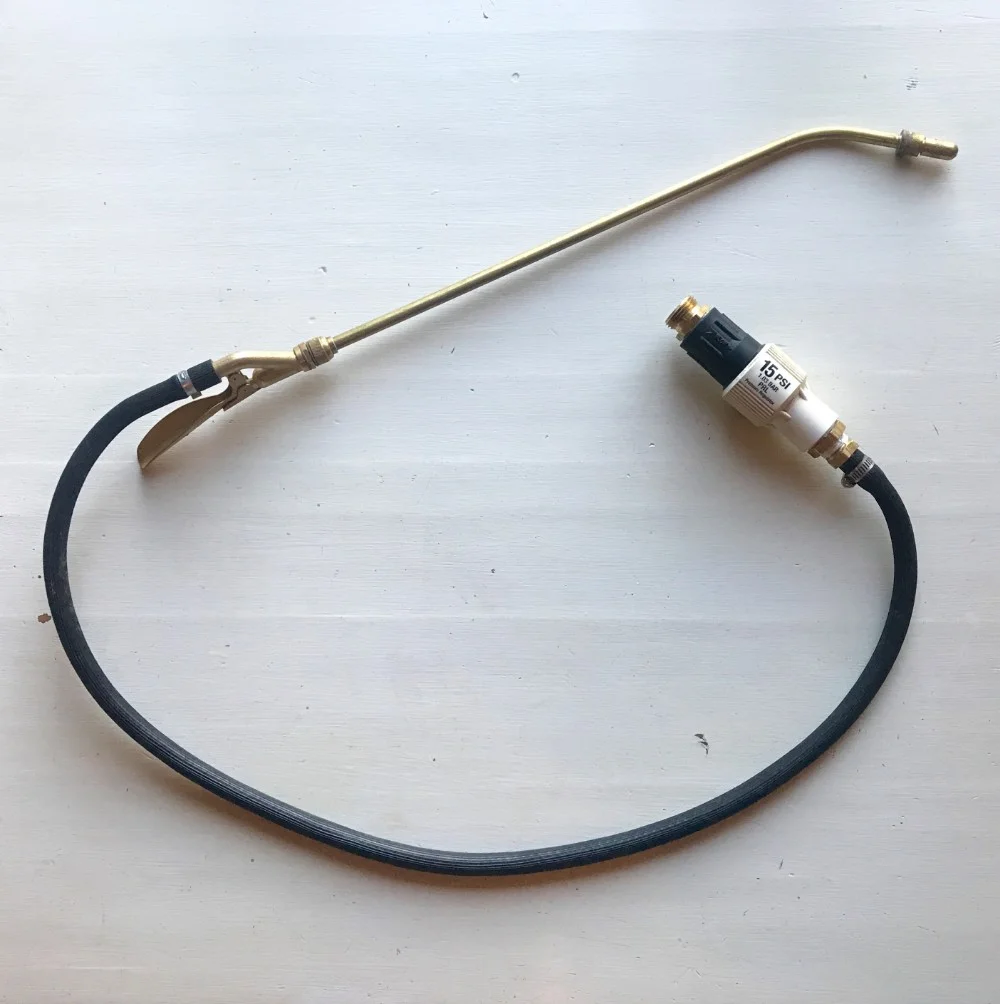
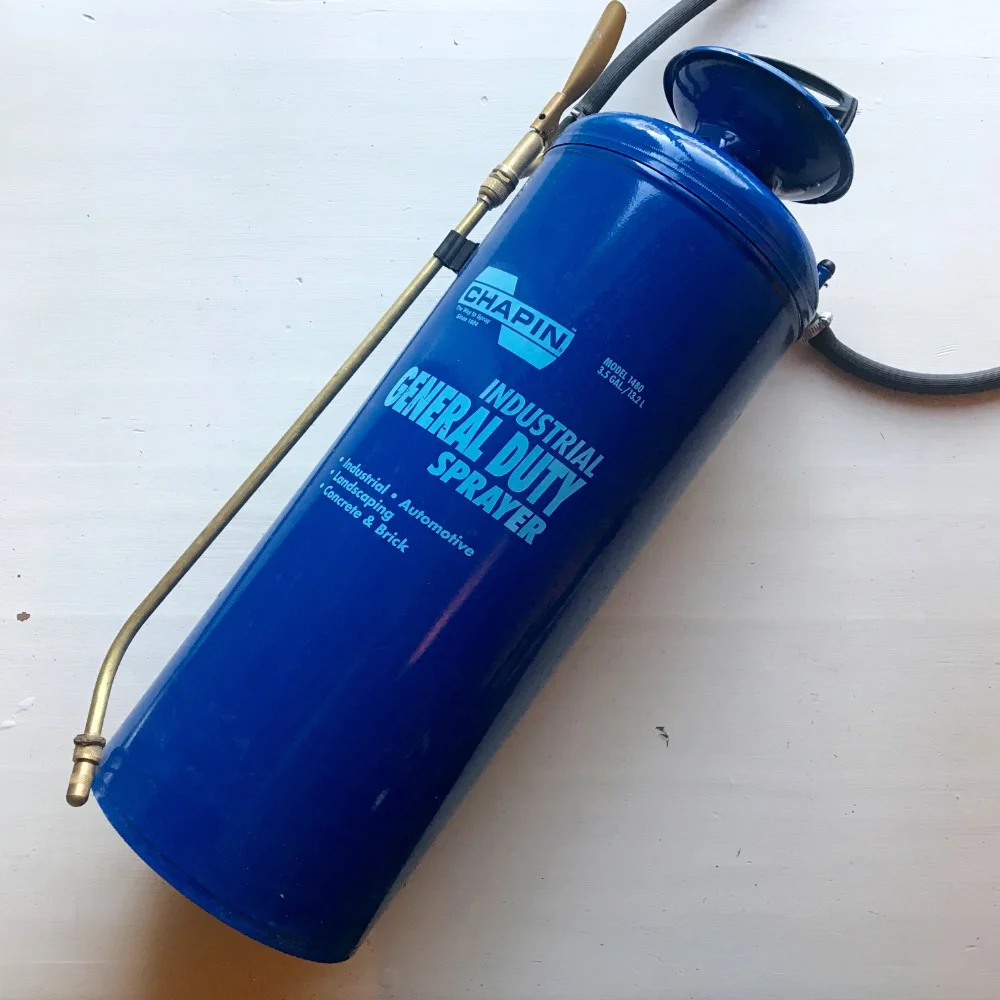
I prefer a sprayer wand. The fine mist distributes water broadly and slowly over the surface of my soil blocks allowing for effective absorption and the long skinny handle makes it easy to slip the wand between plants and get right to the back of my trays. If you don't have a water tap nearby, this type of sprayer wand can be supplied with a hand held tank that can be pumped by hand to for adequate water pressure. I started with a tank like this before our basement had a sink. Later on, I plumbed in a water faucet for my seed starting area and hooked my sprayer wand directly to the tap. This was a nice upgrade from the portable water tank, but it required the addition of a pressure regulator to limit the water pressure to 15 PSI. Our household tap pressure was in the range of 80 PSI, far too much to point directly at soil blocks.
I have played around with bottom watering and it's kind of nice, but you need to leave larger gaps between blocks to make sure the water passes through all of the cracks and gets to each block. Another weakness of bottom watering is that it thoroughly soaks all blocks without judgement, but sometimes some of your blocks have plenty of moisture and shouldn't be given more water, so a little judgement can go a long way to keeping your collection of seedlings in good health. I'll admit that I have dreamed of creating some kind of automated bottom watering system for my seedlings, but for now, my preference is still to top water with my micro sprayer because it gives me the most control.
Once I move my seedling trays into our outdoor nursery greenhouse, I switch to watering with a typical garden hose and watering wand with a fine rose at the end. This type of wand applies a lot more water, but that's not a problem at this point, because it doesn't matter if water overflows from the trays in this location and the blocks are well covered by plant leaves and bound together by roots at this point so there's no risk of the soil blocks washing away.
Where can I buy soil blockers?
If you're in Canada, West Coast Seeds is a good source. Click here to see their soil blocker selection.
If you're in the United States, Johnny's Seeds is a good source. Click here to see their soil blocker selection.

What other equipment will I need?
Aside from solid trays and a watering plan, which we've already covered, it's really nice to have a flat rectangular trowel when working with soil blocks. Garden trowels have a pointed tip and they're faces are curved which makes them much less effective at sliding under and between the blocks when it's time to separate them and transplant them in the field. Here's a link to the rectangular trowel I like to use. You won't find it at a garden centre, but most hardware stores will have something like this in their masonry department.

Since my trowel is flat with a rectangular tip, I can easily slide it under my soil blocks to scoop them out for planting or slip it down vertically between the blocks to help separate them. This is also the moment when it's really nice to have one sidewall missing from our trays too!
What are alternatives to buying soil blockers?
Since I started using soil blocks a decade ago, a couple other notable seed starting alternatives have come onto the market.
One is the Paperpot system. It replaces plastic cell trays with a paper webbing that can hold your potting mix for seed starting and later be unravelled quickly with a Paperpot transplanter. The apparent ease of transplanting is the big appeal here, but it costs thousands of dollars to buy even the basic supplies to start using the system, and it comes with ongoing costs, since the only way to use Paperpots is to keep buying new paper chain pots. Upon closer inspection, I quickly learned that the transplanting action is only perfect if the soil in the bed is prepared perfectly and the germination in the paper chain pots is perfect. If anything is less than perfect, a bunch of touch up time is required to fill in missed transplants, or repair sections of transplanting where the paper pots didn't settle into the soil just right. My bed preparation and seed germination is good, but not perfect, so I like the ability to do some quality control along the way as I transplant my soil blocks by hand. Yes, it will take me a few minutes more to transplant each bed by hand, but without the Paperpot system I'm saving a few dollars per bed in recurring costs and avoiding a significant capital investment.
Another tempting alternative was the Winstrip tray. These trays look similar to standard plastic cell trays at first, but they are made of much thicker plastic to endure the true rigours of growing and the cells are all vented a little bit on the sides and bottom in an attempt to help roots air prune like they do with soil blocks. Based on Winstrip photos and videos I've watched, the seedling plugs don't seem to have the wrap around root problem like most other plugs grown in plastic cells, but there are still plenty of roots pressed up around the outside of the plug. Anytime you grow something in a plastic cell, that's just going to be the reality. It's hard to compete with the air pruning ability of true soil blocks. Furthermore, as with the Paperpot system, there is a significant buy-in required to get started with Winstrip trays and accessories and you have to equip yourself for the maximum volume of trays you'll ever need at one time for every different size of tray that you'll want to use. If I went this route, I'd be back to storing a bunch of extra plastic stuff that hardly gets used.
Are soil blocks still my top choice for seed starting?
At our scale, the soil blockers still make the most sense. I love that I don't have much seed starting equipment to store, I like that my block making process is easily customized to the quantity and size of blocks that I need for each seed starting task, and I always appreciate when I can buy in to a system once without committing myself to a bunch of ongoing costs. Therefore, soil blockers are still my top pick for seed starting.
However, despite the immediate benefits of soil blocks and long term cost savings, I know that some who read this are still going to be drawn back to the flimsy plastic cell trays because they may seem cheaper in year one. You're free to make your own choices of course, but I have saved one last benefit of soil blockers to wrap up, one that I haven't seen mentioned anywhere else before. The final benefit is that soil blockers are shareable! This is one thing that can't be said about Winstrip trays, paper pot chains, or even standard plastic pots and cell trays. So, if the start-up cost of soil blockers is too much for you in year one, just partner up with a few gardening buddies invest in a soil blocker set together.


.png)


.png)